
Update Kuper
New Kuper versions bring fixes and new features. Updating usually takes a couple of minutes, but some versions also need small changes in your project. This page tells you which ones.
Step 1: Find your version and the latest one
Section titled “Step 1: Find your version and the latest one”-
Your version is in
buildSrc/src/main/java/Versions.kt:const val kuper = "x.x.x" -
The latest version is:
(ignore the
v).
Step 2: Apply the changes for each version, in order
Section titled “Step 2: Apply the changes for each version, in order”Look at the list below. Starting from the version right after yours, apply each version’s changes, one version at a time, until you reach the latest.
For example, if you’re on 2.3.0 and the latest is 2.3.7, apply 2.3.1, then 2.3.2, and so on. If a version isn’t listed, it doesn’t need any changes, so skip it.
Most entries link to a commit, a page on GitHub that shows what changed in each file. It looks like this:
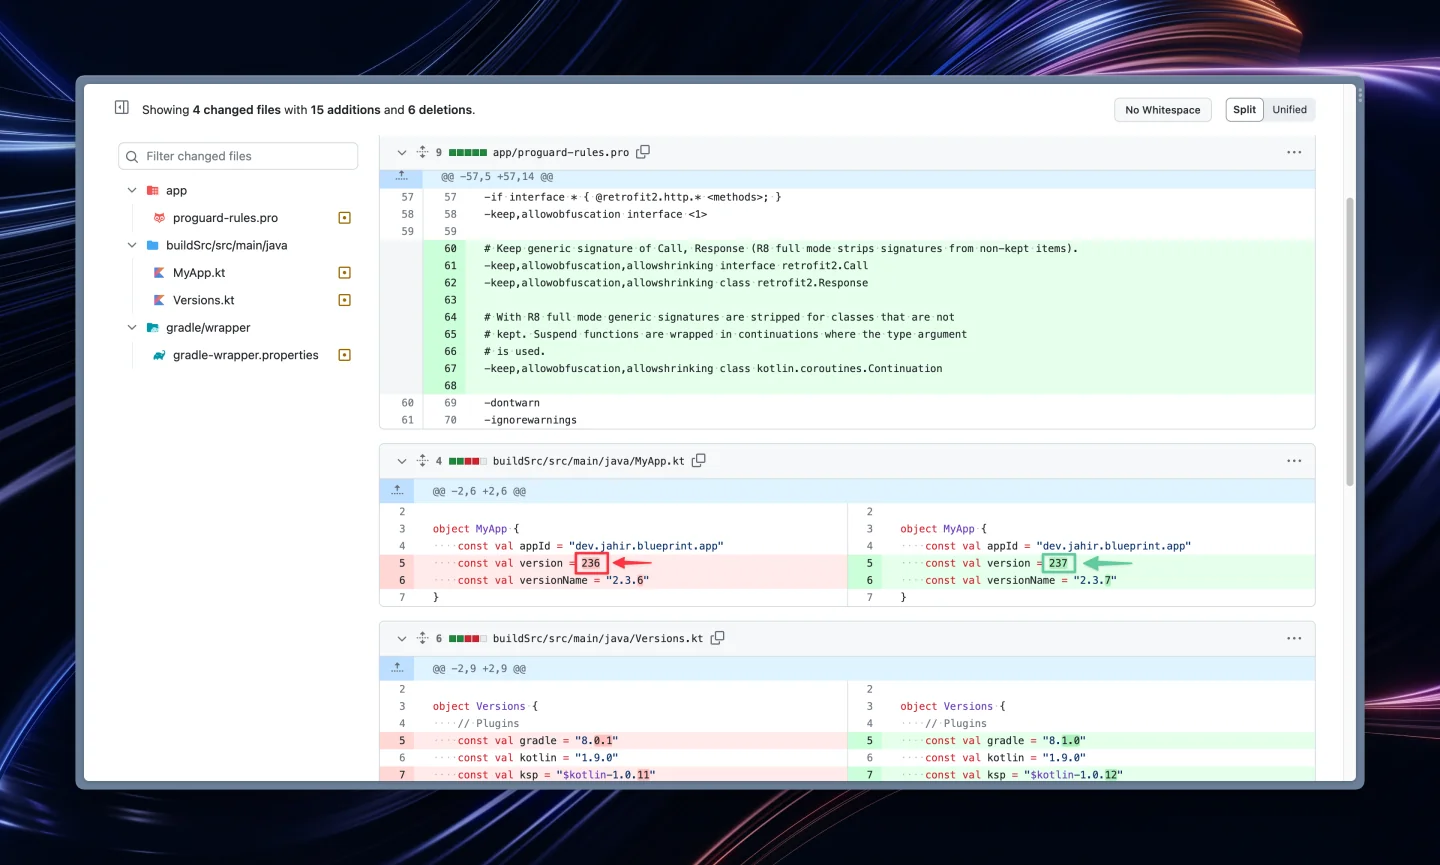
- Red lines were removed. Delete them from your file.
- Green lines were added. Add them to your file.
- When only part of a line changed, that part is highlighted in a darker color.
Make the same changes in your project. You can skip changes to files you’ve customized with your own content, like icons, wallpapers or texts, unless the entry says otherwise.
Step 3: Update the version number
Section titled “Step 3: Update the version number”Set kuper in Versions.kt to the latest version, then click File → Sync Project with Gradle Files and run your app to check that everything works. 🚀
Stuck on a version? Ask in the Discord server, and mention which version you’re updating from.
Changes for each version
Section titled “Changes for each version”v2.7.0
Section titled “v2.7.0”Apply the changes in this commit.
v2.6.1
Section titled “v2.6.1”Apply the changes in this commit.
v2.6.0
Section titled “v2.6.0”Apply the changes in this commit.
v2.5.4
Section titled “v2.5.4”Apply the changes in this commit.
v2.5.3
Section titled “v2.5.3”Apply the changes in this commit.
v2.5.2
Section titled “v2.5.2”Apply the changes in this commit.
v2.5.1
Section titled “v2.5.1”Apply the changes in this commit.
v2.5.0
Section titled “v2.5.0”Apply the changes in this commit.
v2.4.9
Section titled “v2.4.9”Apply the changes in this commit.
v2.4.7
Section titled “v2.4.7”Apply the changes in this commit.
v2.4.6
Section titled “v2.4.6”Apply the changes in this commit.
v2.4.5
Section titled “v2.4.5”Apply the changes in this commit.
v2.4.2
Section titled “v2.4.2”Apply the changes in this commit.
v2.4.1
Section titled “v2.4.1”Apply the changes in this commit.
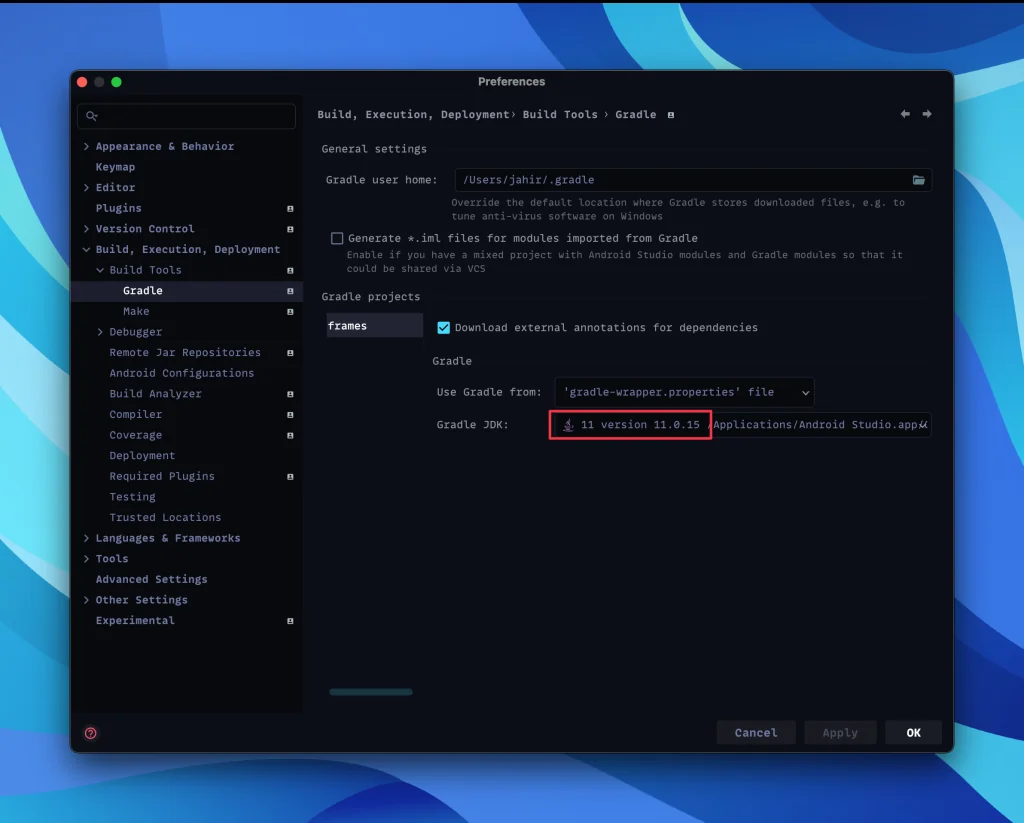
Also update the Gradle settings in Android Studio, as shown here:
v2.4.0
Section titled “v2.4.0”Apply the changes in this commit.
v2.3.8
Section titled “v2.3.8”Apply the changes in this commit.
v2.3.6
Section titled “v2.3.6”Apply the changes in this commit.
v2.3.5
Section titled “v2.3.5”Apply the changes in this commit.
v2.3.4
Section titled “v2.3.4”Apply the changes in this commit.
v2.3.3
Section titled “v2.3.3”Apply the changes in this commit.
v2.3.2
Section titled “v2.3.2”Apply the changes in this comparison.
v2.2.8
Section titled “v2.2.8”Apply the changes in this commit.
v2.2.5
Section titled “v2.2.5”Apply the changes in this commit.
v2.2.4
Section titled “v2.2.4”Apply the changes in this commit.
v2.2.3
Section titled “v2.2.3”Apply the changes in this commit and this commit.
v2.2.1
Section titled “v2.2.1”Apply the changes in this commit and this commit.
v2.1.6
Section titled “v2.1.6”You can now change the colors of snackbars. Set them up in your colors.xml file
v2.1.3
Section titled “v2.1.3”Optional: if you want more customization options, apply the changes in this commit.
v2.0.8
Section titled “v2.0.8”Apply the changes in this commit.
v2.0.7
Section titled “v2.0.7”The frames_setup.xml file was split in 2 and the new dashboard_setup.xml has been created. Be sure to set them up.
v2.0.0 and newer
Section titled “v2.0.0 and newer”The dashboard was rewritten from scratch, so it’s easier to start a new project from the sample. Save your assets and XML files first: most of them still work.
Older versions
Section titled “Older versions”Show older versions
v1.7.1
Section titled “v1.7.1”Add this line to the app’s AndroidManifest.xml
v1.7.0
Section titled “v1.7.0”Apply the changes in this commit.
v1.6.3
Section titled “v1.6.3”Apply the changes in this commit.
v1.6 and newer
Section titled “v1.6 and newer”Apply the changes in this commit.
Then delete the folder .idea/libraries/ and all build folders, and then restart Android Studio using the Invalidate Caches and Restart option.
v1.4.9
Section titled “v1.4.9”Apply the changes in this commit.
v1.4.6
Section titled “v1.4.6”Update the app/build.gradle and dependencies.gradle files.
v1.4.4
Section titled “v1.4.4”Update the app/build.gradle and dependencies.gradle files.
v1.4.2
Section titled “v1.4.2”Apply the changes in this commit.
v1.3.8
Section titled “v1.3.8”Apply the changes in this commit.
v1.3.6
Section titled “v1.3.6”Apply the changes in this commit.
v1.3.1 to v1.3.3
Section titled “v1.3.1 to v1.3.3”Apply the changes in this commit. Basically just some minor version updates.
v1.2.7
Section titled “v1.2.7”- Update your build.gradle to match the new
app/build.gradlefile - Update the proguard files:
- Changelog support has been added. Check how to set it up here.
v1.1.5
Section titled “v1.1.5”-
OneSignal plugin version is now explicitly defined due to some issues. Check the new
app/build.gradlefile here. -
Notifications are enabled by default now, if you don’t want them to be enabled you can easily set this config to
falseinapp/src/main/res/values/frames_configs.xml:
<!-- Do you want notifications to be enabled for all your users?- True means yes- False means no--><bool name="notifications_enabled_by_default">true</bool>v1.1.0 and newer
Section titled “v1.1.0 and newer”-
Many things in the project changed, but it’s all for good. Please kindly check my last commit and apply these changes to your project :)
-
Firebase is not used for notifications anymore. Start using OneSignal which is easier to setup. Tutorial available in wiki.
v1.0.8
Section titled “v1.0.8”Basically just do what I did in this commit. 😅
v1.0.6
Section titled “v1.0.6”Update these files:
app/build.gradleapp/proguard-rules.pro
Their content changed to fix some issues.
v1.0.4
Section titled “v1.0.4”Some things changed in AndroidManifest.xml. Apply those changes in your projects too. Check what changed here
Made by Jahir Fiquitiva. Questions? Ask in the Discord server.